


Gorod Krovi is the point in **Call of Duty: Black Ops III Zombies where everything ramps up: dragons patrol the sky, Manglers flood your rounds, and the main quest piles on multi-step objectives across a huge map. It looks intimidating—especially solo—but the Easter egg becomes very manageable when you follow the correct order and set up efficiently.
This 2026 guide covers the full Gorod Krovi main Easter egg from turning on power to the two-phase boss fight. It’s written to be usable in solo or co-op, with clear checkpoints, part locations, and practical tips to avoid common run-killers.
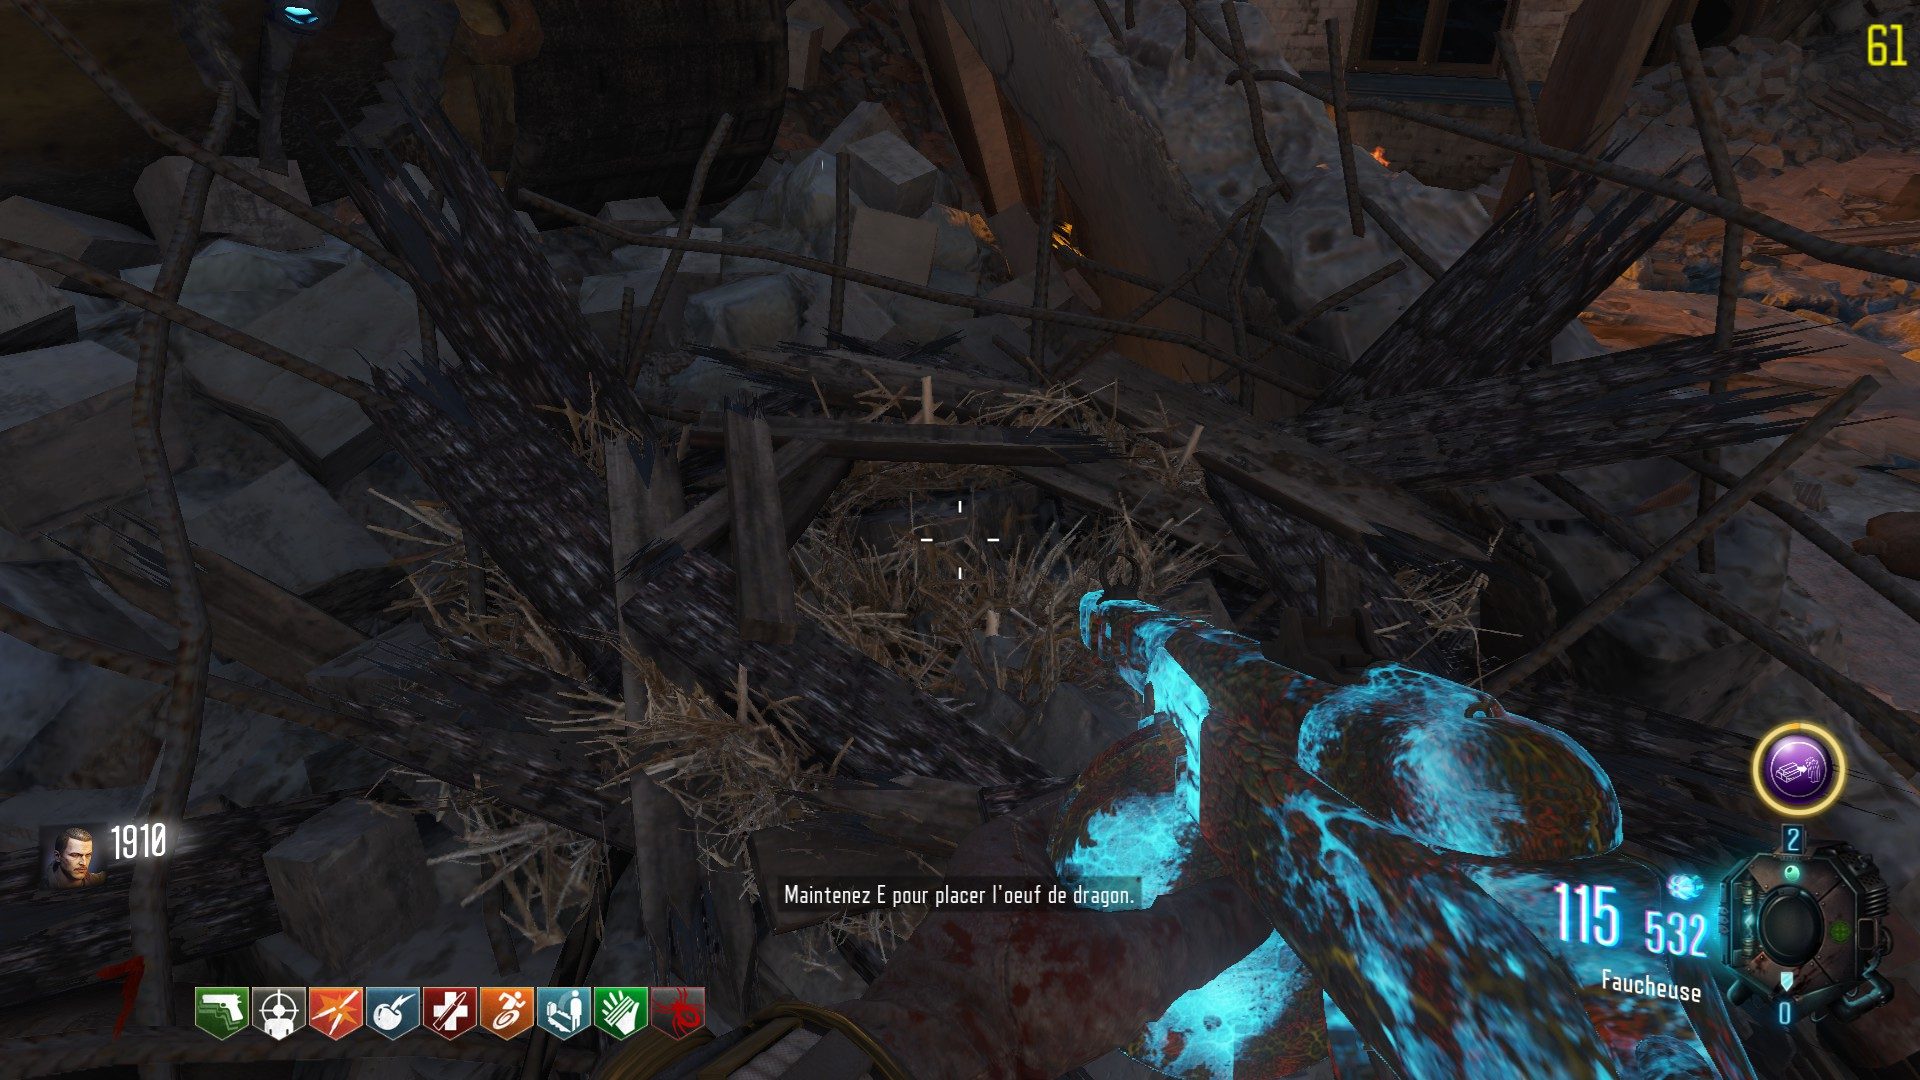
Table of Contents
- 1 Step 1: Turn On the Power
- 2 Step 2: Unlock Pack-a-Punch (Code Cylinders + Network Circuits)
- 3 Step 3: Build the Guard of Fafnir (Dragon Shield)
- 4 Step 4: Dragon Egg + Gauntlet of Siegfried
- 5 Step 5: Valve Puzzle and the Pink Cylinder (KRONOS)
- 6 Step 6: Collect All 6 Trophies
- 7 Step 7: Complete Trophy Challenges
- 8 Step 8: Deliver Power Cores and Prepare for Boss Fight
- 9 Step 9: Boss 1 – Defeat the Dragon
- 10 Step 10: Boss 2 – Defeat Nikolai
- 11 Want the Clear Without the Repeats?
Step 1: Turn On the Power
From spawn, push through the Department Store and follow either path toward Dragon Command. The power switch is located near SOPHIA (left side of her terminal area). Flip it to activate power and open up key interactions for the main quest.
Step 2: Unlock Pack-a-Punch (Code Cylinders + Network Circuits)
After power is on, kill zombies until one drops a Code Cylinder (it glows green like a power-up). Pick it up and take it to the required terminal locations in this order:
-
Dragon Command
-
Supply Depot
-
Armory
At each terminal:
-
Insert the Code Cylinder
-
A Groph Module is summoned
-
Look for a green beam in the sky (the module landing zone)
-
Defend the module until it opens
-
Collect the Network Circuit
Repeat until you have all three circuits. Then head underground to the Operations Bunker (beneath the Infirmary/Armory area) and insert the circuits into the central computer terminal.
Now you can call a dragon from the designated pads and ride it to the Pack-a-Punch area.
Tip: You can Pack-a-Punch now, but save the Dragon Strike crystal event for later when it helps with setup.
Step 3: Build the Guard of Fafnir (Dragon Shield)
You need the Dragon Shield for survival and later quest steps. There are 3 parts with multiple spawn points:
Shield Part 1 (near Department Store / Ops Bunker)
-
On a chair near Jugger-Nog (upper Department Store)
-
Outside Jugger room on a crate near a crashed truck
-
On shelves in the Operations Bunker
Shield Part 2 (Infirmary route)
-
On the ground between crates (Infirmary → Ops Bunker path)
-
On bunk beds before the upstairs stairs
-
On a wall near Stamin-Up (Infirmary)
Shield Part 3 (Armory route)
-
Wall near Wunderfizz (lower Armory)
-
Wall by the train cart path toward Supply Depot
-
Near the bridge between Armory and Infirmary
Build it at the crafting table in the Operations Bunker.
Step 4: Dragon Egg + Gauntlet of Siegfried
Ride a dragon to Pack-a-Punch, then go to the lower area near the sewer fast-travel. Look up into the rafters and shoot the Dragon Egg down. Pick it up.
Bring the egg to the nest outside Dragon Command and place it. Wait for a dragon to breathe fire on it, then let it cool for a couple rounds and retrieve it.
Now complete the egg’s kill challenges:
-
10 Napalm Zombie kills (triggered by dragon fire on zombies)
-
10 penetration kills (LMG like the MG-42 makes this easy)
-
10 melee kills (Dragon Shield fire blast counts well; Bowie Knife works too)
When you’re ready, start the Pack-a-Punch crystal lockdown (4 phases). This is a great time to farm penetration and melee kills while you’re forced to hold position.
Afterwards, place the egg into the Incubator in the Pack-a-Punch basement and complete the mini-lockdown (Valkyries included). If possible, let a Valkyrie zap the nearby generator so it powers up—this makes later steps easier.
Next round, pick up the hatched egg and return to spawn. Interact with the correct gravestone medal to claim the Gauntlet of Siegfried.
Step 5: Valve Puzzle and the Pink Cylinder (KRONOS)
Once that generator is powered, valves around the map become active (for a limited time each round). The six valve locations include:
-
Department Store (top floor)
-
Armory (top floor)
-
Infirmary (ground floor corner)
-
Dragon Command (stairs area)
-
Supply Depot (under balcony)
-
Tank Factory (ground floor)
Your goal is to route power from the green-lit valve to the chamber holding the pink cylinder by setting valve numbers (1–3) correctly. Once solved, grab the pink cylinder and return it to SOPHIA.
SOPHIA then asks for a password: KRONOS (you can reveal it by shooting through letter rows, but it’s always the same).
Step 6: Collect All 6 Trophies
You need six trophies from around the map:
-
Dragon Command: shoot the trophy off the soldier mural
-
Supply Depot (outside): use Dragon Strike on the green puddle
-
Supply Depot (inside): use the Eye Beam trap to open a safe
-
Tank Factory: Dragon Shield fire blast into the open pipe
-
Operations Bunker: punch open the wall safe using Gauntlet dash
-
Pack-a-Punch: shoot the sewer button, then retrieve trophy from the “toilet” back upstairs
Return to Dragon Command and place all trophies on the map terminal opposite SOPHIA.
Step 7: Complete Trophy Challenges
Activate the terminal; one trophy is selected at random and starts a challenge. You’ll complete all of them across rounds:
-
Gersh: follow and shoot the moving yellow light until it returns to Dragon Command
-
Bomb defusal: memorize the green flash sequence; defuse six bombs in exact order (fail = death)
-
Mangler escort: guide the friendly green-eyed Mangler from Tank Factory to Dragon Command
-
Valkyrie escort: guide the friendly green-eyed Valkyrie from Belinski Square without splash damage
-
Groph Module: defend the out-of-bounds module; use Gauntlet dragon to retrieve cargo
-
Group 935 (always last): take keycard to Pack-a-Punch terminal, survive Mangler lockdown, return keycard to SOPHIA
Once all trophy challenges are done, SOPHIA allows you to take Power Cores.
Step 8: Deliver Power Cores and Prepare for Boss Fight
Bring the Power Cores to Nikolai’s mech in Belinski Square by using the Gauntlet’s dragon command. When confirmed, return to SOPHIA—she moves, revealing the sewer grate to the boss arena.
Recommended prep:
-
Strong wonder weapons (Ray Gun Mk3 is excellent)
-
Shield durability high
-
Survival perks you prefer
-
Emergency GobbleGums like Idle Eyes or In Plain Sight if available
Interact with the sewer grate when ready, then press the green button in the arena to start.
Step 9: Boss 1 – Defeat the Dragon
This phase is straightforward:
-
Keep moving and avoid fire zones
-
Wait for Nikolai to harpoon the dragon
-
Shoot the glowing orange weak spot
Repeat this cycle three times to kill the dragon.
Step 10: Boss 2 – Defeat Nikolai
Now fight Nikolai in his mech:
-
Avoid stomps, cannons, and explosives
-
Shoot the glowing weak points (two chest, two head)
-
After all are destroyed, finish the exposed core
A cutscene plays and the Easter egg completes.
Save tip: Advance one full round after completion to ensure progress sticks.
Want the Clear Without the Repeats?
Gorod Krovi is infamous for long setup time and high failure cost—especially the bomb sequence and escort steps. If you want to secure completions, quest clears, or Zombies progression without rerunning the whole map, Game Boosting at GladiatorBoost can help you finish Easter eggs efficiently and consistently while avoiding the grind of repeated attempts.
Related Guides

Black Ops 7 Illicit Cargo Event Rewards Guide: Every Camo, Challenge & Unlock Explained
Forza Horizon 6 Treasure Hunt in Tokyo City Location (Spring) – Complete Guide

Forza Horizon 6 AstroToy Photo Challenge Guide: HZN-VI Rocket Location Explained
Guild Wars 2 Leveling Guide: The Fastest Ways to Reach Level 80