


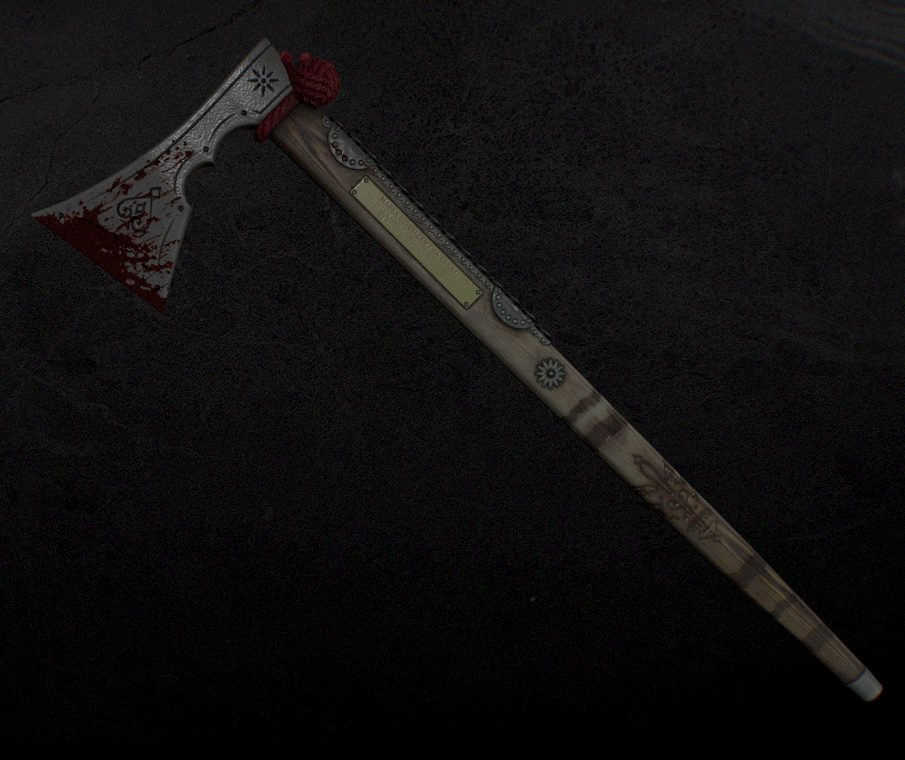
Dying Light: The Beast – How to Get the Ciupaga Axe (Leviathan Axe Easter Egg)

The Ciupaga Axe is one of Dying Light: The Beast’s cheekiest nods to other games—a heavy hitter that boomerangs back to your hand after a throw, clearly inspired by God of War’s Leviathan Axe. While it won’t freeze enemies solid, it does return-to-sender on command and unlocks a slick resource-farming perk once you’ve used it in combat. Below is a clean, spoiler-light route to the axe, plus tips to ensure it actually spawns, how to throw-and-recall correctly, and what to do with the blueprint you get alongside it.
Table of Contents
- 1 Requirements & Spawn Conditions (Don’t Skip)
- 2 Exact Location (Southeast of the Monastery)
- 3 Parkour Route to the Axe (Step-by-Step)
- 4 How to Throw & Recall the Ciupaga (Controller & KBM)
- 5 Special Perk: Post-Kill Resource Harvesting
- 6 Blueprint & Upgrading the Axe
- 7 Troubleshooting: Axe Didn’t Spawn?
- 8 Combat Tips (Make It Sing)
- 9 Short on Time? GladiatorBoost Can Unlock It for You
Requirements & Spawn Conditions (Don’t Skip)
-
Recommended Level: 6+ (you can walk there earlier, but the encounter and parkour chain feel much smoother with a few stamina/HP upgrades).
-
Story Progress: Finish the opening questline from the Monastery and at least “a few” early missions so the axe spawns in. If you sprint straight from the intro, you may arrive to an empty perch.
-
Loadout: A couple medkits, one noise distraction (bottle/flare), and a backup melee. You’ll be clambering around a tall house with infected at ground level.
Exact Location (Southeast of the Monastery)
From the Monastery starting zone, head southeast along the ridge path that snakes toward the valley neighborhoods. You’re looking for a large timber-framed house with exposed wooden beams and a wraparound balcony. The place sits slightly raised from the road and often spawns a noisy cluster of shamblers near the fence line.
Clear the yard first. A quick sweep prevents grabby hands from interrupting your climbs. Toss a distraction toward the street or thin the pack with a couple headshots before you begin the ascent.
Parkour Route to the Axe (Step-by-Step)
-
Approach From the East: Circle to the eastern side of the house. You’ll see a slanted stone foundation that acts like a ramp up to the second-floor balcony. Sprint up and mantle onto the balcony.
-
Left to the Rockers: On the balcony, head left. Follow it until you reach an open nook with two rocking chairs. Face the chimney.
-
Beam to Ledge: To the left of the chimney, look up for a horizontal wooden beam. Jump and hold to grab it, then mantle to a narrow roof ledge. Shimmy right, staying tight to the wall.
-
Drop to Perpendicular Ledge: At the ledge’s end, look down; there’s another skinny ledge running perpendicular beneath you. Lower yourself carefully (don’t full-drop) and start edging along that lower ledge.
-
Up to the Small Balcony: Midway along, you’ll see a tiny balcony above with a simple wooden railing. Climb the railing to get on that balcony platform. Stay standing on the railing for a better angle.
-
Claim the Prize: Stare at the top of the balcony doorway frame. The Ciupaga Axe is mounted above the lintel—a subtle glint gives it away. Jump-grab to collect it.
When you pick up the Ciupaga, you’ll also unlock its crafting blueprint, letting you recraft higher-level variants as your character progresses.
How to Throw & Recall the Ciupaga (Controller & KBM)
The star trick: it returns automatically after a throw—no separate recall button needed.
-
Xbox: Hold LT to aim, press RB (or your bound throw key) to throw.
-
PlayStation: Hold L2 to aim, press R1 to throw.
-
Keyboard/Mouse: Aim with Right Mouse Button, throw with F (default “throw melee” binding).
If the axe hits an enemy, it snaps back to you instantly after impact. If you miss, it still returns on a short delay, arcing back toward your hand. You can keep moving while it flies back—no need to wait in place.
Tip: Aim slightly center mass on runners. The throw has weight; a modest drop compensates for bobbing heads.
Special Perk: Post-Kill Resource Harvesting
Using the Ciupaga unlocks a context perk: certain enemies you strike and kill with the axe leave them in a state that allows you to harvest extra crafting resources (think salvaged materials, not rare uniques). It’s most noticeable on human enemies and “fresh” turned infected. To maximize:
-
Throw Openers: Start a fight with a throw to proc the perk, then finish with a follow-up swing if needed.
-
Head/Upper Torso: Consistent returns and faster kills mean more bodies processed per minute.
-
After Fights: Do a quick loop to loot marked corpses—the perk glow (or icon, depending on settings) signals bonus yields.
Blueprint & Upgrading the Axe
Grabbing the Ciupaga also grants its blueprint:
-
Scaling: As you level, craft higher-tier versions so the damage keeps pace.
-
Mods: The Ciupaga accepts standard edge/handle mods (bleed, shock, durability). Even without frost effects, shock pairs nicely with the throw for brief stuns.
-
Durability: Returning throws don’t chew durability faster than normal swings, but whiff-spamming will. Consider a durability mod if you plan to use it as your primary.
Troubleshooting: Axe Didn’t Spawn?
-
Progress a Few Quests: If the ledge is empty, advance the main story two or three missions and revisit.
-
Time of Day: Return during daylight for clean visuals and fewer specials.
-
Fast Travel Reset: Move zones (Monastery → town → back) to nudge the spawn.
-
Already Claimed? Check your inventory and blueprints; once taken, it won’t reappear on the frame.
Combat Tips (Make It Sing)
-
Two-Stage Bossing: Throw (stagger), sprint in for a charged heavy, then quick-throw again on the exit. You’ll juggle elites safely.
-
Crowd Control: Pivot throws through the second or third body in a line—pierce isn’t guaranteed, but the return path often clips an extra target.
-
Mobility: Don’t “wait” for the catch. Slide, vault, and wall-run while it arcs back; the auto-reclaim is generous.
Short on Time? GladiatorBoost Can Unlock It for You
If you want the Ciupaga without the runaround—or you’d like a fully leveled variant with materials to spare—GladiatorBoost’s Dying Light: The Beast Boosting can handle the unlock route, blueprint acquisition, and resource farming for you. All services are completed manually and securely, so you log back into a character that’s ready to slam through mid-game content—no grind, all payoff. It’s also a great option if you just need level boosts to meet the recommended threshold for the spawn.
Related Guides

ARC Raiders Red Coral Jewelry Farming Guide: Best Locations and Fastest Loot Routes

Best Early Cars in Forza Horizon 6: Fastest Budget Unlocks for New Players

Forza Horizon 6 House Locations Guide: Every Home, Price, Perk, and Unlock Requirement

Black Ops 7 Zombies Wonder Weapons Ranked: The Ultimate Tier List