


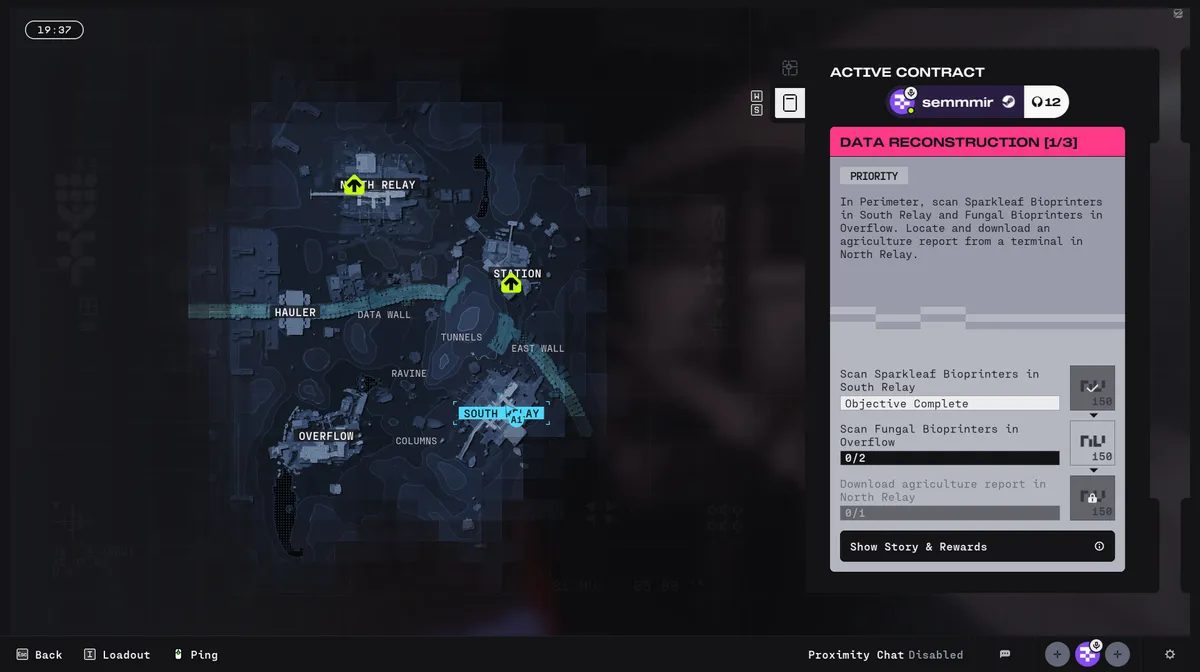
Marathon Data Reconstruction 1 Walkthrough – Bioprinter & Agriculture Report Locations

The Data Reconstruction 1 contract is the opening chapter of a three-part mission chain from the NuCaloric faction in Marathon. While it sounds straightforward—scan bioprinters and download a report—it quickly becomes confusing because none of the required locations are marked clearly on your map.
This guide breaks down:
-
Where to find both Sparkleaf Bioprinters (South Relay)
-
Where to locate both Fungal Bioprinters (Overflow)
-
How to access and power the Agriculture Report terminal (North Relay)
-
What rewards you earn upon completion
If you’re struggling to survive long enough to complete multi-stage contracts like this, a Marathon boosting service can help you push through faction missions efficiently.
Table of Contents
Important Contract Notes
Before diving into locations, remember:
-
Objectives must be completed in order.
-
If you get downed mid-progress, your scanned objectives carry over into the next raid.
-
This contract spans multiple POIs on Perimeter, so expect long rotations.
Because of its length, bringing strong gear or defensive tools is recommended. If your loadout feels underpowered for high-traffic areas like Overflow, upgrading beforehand or choosing to buy weapons in Marathon can significantly increase your survivability.
Step 1: Sparkleaf Bioprinters – South Relay
Your first objective is to scan two Sparkleaf Bioprinters located in South Relay on Perimeter.
Complete these first before moving to other POIs.
Sparkleaf Bioprinter #1 (Northwest South Relay)
Head to the northwest side of South Relay.
Look for:
-
A small, single-story building
-
Cracked glass windows
-
Modest interior office layout
Inside:
-
Locate a cubicle-style desk area
-
The Sparkleaf Bioprinter sits on top of a desk
Interact with it to complete the first scan.
Sparkleaf Bioprinter #2 (Southeast South Relay)
Next, rotate to the southeast portion of South Relay.
Look for:
-
A NuCaloric building
-
Multi-room interior
Enter through the ground floor and proceed to the rear storage room.
Inside:
-
The second Sparkleaf Bioprinter is placed on a white shelf
Scan it to finish the first contract stage.
Because South Relay can attract traffic, consider carrying backup healing and shield supplies. If you’re low on consumables, checking available Marathon items for sale before deploying can prevent mid-quest failures.
Step 2: Fungal Bioprinters – Overflow
The second phase sends you to Overflow.
You must scan two Fungal Bioprinters inside the same large building.
Fungal Bioprinter #1 (Eastern Overflow – Second Floor)
Go to the eastern side of Overflow and locate a building with:
-
A broken window
-
A forklift positioned nearby
Use the forklift to climb through the broken window and reach the second floor.
Follow the right-side corridors until you see the quest indicator.
The Fungal Bioprinter is:
-
Sitting on a shelf
-
Clearly interactable
Scan it to proceed.
Fungal Bioprinter #2 (Southwest Section of Same Building)
Remain inside the same structure.
Move toward the southwest section of the building.
Continue along interior corridors until you find:
-
A server room
-
The second Fungal Bioprinter placed on a server rack
Interact to complete the second objective.
Overflow is often a high-risk PvP zone, so avoid lingering after scanning.
Step 3: Agriculture Report – North Relay
The final objective takes you to North Relay.
Here, you must download the Agriculture Report from a powered terminal.
Finding the Terminal Building
Head to the northwest section of North Relay.
Look for:
-
A two-story building
-
Interior staircase on the right
Go upstairs.
At the top:
-
Turn immediately left
-
Enter a bathroom
-
Locate a ventilation shaft
Climb through the vent to reach the terminal room.
Restoring Power to the Terminal
The terminal will be offline.
To restore power:
-
Backtrack downstairs.
-
Locate the wall-mounted power switch.
-
Activate it.
-
Return upstairs through the vent.
Now the terminal will be powered.
Interact to download the Agriculture Report.
Extract to Complete the Contract
Once all objectives are complete:
-
Safely extract from the zone
Upon successful exfil, you’ll receive:
-
8XS Med Pack
-
1500 Credits
-
3x Shield Recharge
-
3x Unstable Biomass
-
3x Patch Kit
-
Faction Intel (Codex Entry)
Tips for Completing Data Reconstruction 1 Efficiently
✔ Plan Rotations Carefully
This contract spans three separate POIs. Avoid running straight across open terrain.
✔ Bring a Self-Revive
Long contracts increase risk. A revive kit can save progress mid-run.
✔ Scan & Leave
Don’t overstay after interacting with objectives.
✔ Expect PvP in Overflow
Overflow frequently attracts other Runners.
Is Data Reconstruction 1 Worth It?
Yes.
Beyond immediate rewards, this contract:
-
Advances NuCal faction progression
-
Unlocks deeper contract chains
-
Grants valuable crafting materials
Completing it early strengthens your access to better gear and upgrades.
Final Thoughts
Data Reconstruction 1 may seem confusing at first, but once you know the exact locations, it becomes a structured multi-zone rotation challenge.
To summarize:
-
South Relay → Scan 2 Sparkleaf Bioprinters
-
Overflow → Scan 2 Fungal Bioprinters
-
North Relay → Restore power & download Agriculture Report
-
Extract safely
Approach it methodically, avoid unnecessary fights, and prioritize survival over aggression.
Related Guides

ARC Raiders Red Coral Jewelry Farming Guide: Best Locations and Fastest Loot Routes

Best Early Cars in Forza Horizon 6: Fastest Budget Unlocks for New Players

Forza Horizon 6 House Locations Guide: Every Home, Price, Perk, and Unlock Requirement

Black Ops 7 Zombies Wonder Weapons Ranked: The Ultimate Tier List