






Exploring the enormous world of Dragonsword Awakening becomes much easier once you activate its network of Eona’s Legacy towers. These ancient structures function as regional fast-travel points, reveal previously obscured sections of the map, and provide launch mechanisms that help you cross large areas more quickly.
Activating them is not always as simple as reaching the tower. Each Eona’s Legacy presents a different challenge, including sigil-matching puzzles, timed mechanisms, environmental obstacles, combat zones, and platforming trials. Some towers are also positioned inside areas populated by enemies far above the level of players who first encounter them.
This guide explains how to activate every Eona’s Legacy in Dragonsword Awakening, including the required puzzle solutions, useful characters, traversal techniques, and ways to avoid unnecessary fights.
Table of Contents
- 0.1 What Does Eona’s Legacy Do?
- 0.2 How to Use an Eona’s Legacy Launcher
- 0.3 Before Activating Every Tower
- 1 Meadow of Beginnings Eona’s Legacy
- 2 Field of Plenty Eona’s Legacy
- 3 Shadowed Woods Eona’s Legacy
- 4 Steelheart Fortress Eona’s Legacy
- 5 Silver Ford Lake Eona’s Legacy
- 6 Moss Forest Logging Site Eona’s Legacy
- 7 Starshade Forest Eona’s Legacy
- 8 Dragonrise Basin Eona’s Legacy
- 9 Misty Veil Highlands Eona’s Legacy
- 10 Skyridge Uplands Eona’s Legacy
- 11 Breezewind Hill Eona’s Legacy
- 12 Recommended Eona’s Legacy Activation Order
- 13 Most Difficult Eona’s Legacy Puzzles
- 14 Frequently Asked Questions
- 14.1 What is Eona’s Legacy in Dragonsword Awakening?
- 14.2 Do I need to activate every Eona’s Legacy?
- 14.3 Why will an Eona’s Legacy tower not activate?
- 14.4 Which characters are required for Eona’s Legacy puzzles?
- 14.5 How do sigil stands work?
- 14.6 Can high-level enemies be avoided?
- 14.7 How do I complete the Starshade Forest timer?
- 14.8 Are the Eona’s Legacy trials combat challenges?
- 14.9 Does activating a tower reveal the entire map?
- 15 Final Thoughts
What Does Eona’s Legacy Do?
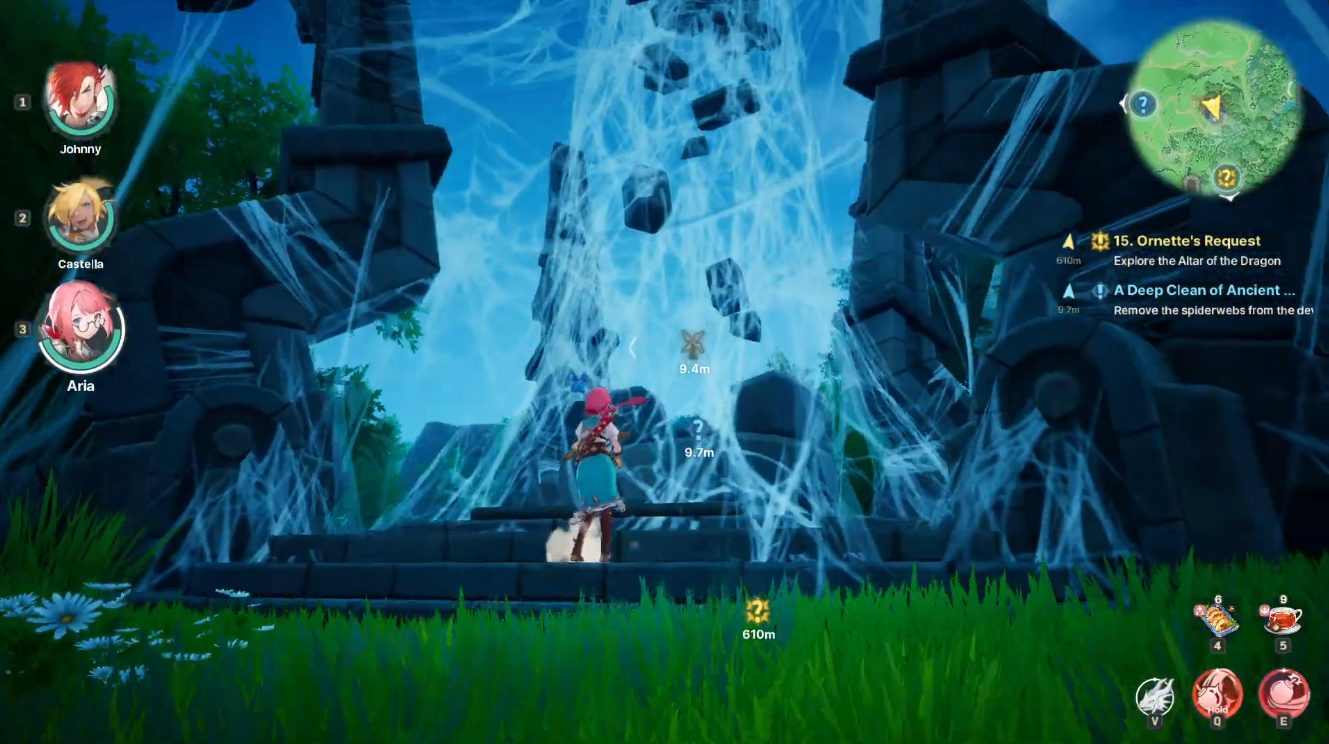
Eona’s Legacy towers are the primary fast-travel structures found throughout the open world. Restoring one provides several permanent exploration benefits.
An activated Eona’s Legacy can:
- Unlock a new fast-travel destination.
- Remove the fog covering part of the regional map.
- Reveal nearby landmarks and points of interest.
- Provide a launcher for rapid local traversal.
- Reduce the time required to revisit quests, bosses, and collectibles.
Because the world expands considerably after the opening regions, activating these towers as soon as you can safely reach them is one of the most efficient ways to improve your exploration experience.
How to Use an Eona’s Legacy Launcher
Most restored towers include a launcher that propels your character in a predetermined direction. This is useful for reaching distant cliffs, crossing valleys, or travelling toward the next objective without following the ground-level route.
To use the launcher effectively:
- Summon your Familiar.
- Move toward the projecting end of the tower.
- Jump while riding or using the Familiar.
- Allow the launch current to carry you forward.
These launchers do not replace fast travel, but they significantly reduce travel time within the same region.
Before Activating Every Tower
Several Eona’s Legacy locations are surrounded by high-level enemies. You do not always need to defeat them to complete the tower puzzle.
Before travelling into a dangerous region, consider the following:
- Use your Familiar to scale walls and bypass guarded paths.
- Switch to a ranged character when puzzles must be solved inside enemy camps.
- Clear nearby enemies only when they repeatedly interrupt interactions.
- Prepare Aria and Luto, as their abilities are required at certain towers.
- Activate towers while naturally progressing through the campaign to minimise backtracking.
Players who want to reach later zones, strengthen their roster, or complete progression objectives more efficiently can also explore the Dragonsword Awakening Boosting Service while continuing through the game’s exploration content.
Meadow of Beginnings Eona’s Legacy
The Meadow of Beginnings tower is the first Eona’s Legacy most players activate. It is introduced through the main story, so its objective markers are clearer than those of later towers.
How to Activate It
Speak with Alvwyn beside the damaged structure. He explains that the tower cannot rebuild itself because an essential cog is missing.
The missing component is located in a nearby hideout. Follow the marked route, enter the hideout, and defeat the enemies guarding the objective. Collect the cog and return it to Alvwyn.
Once the cog is installed, the structure reconstructs itself automatically. The surrounding map becomes visible, and the tower is added to the fast-travel network.
This mission also teaches the basic function of Eona’s Legacy towers and their launch systems.
Field of Plenty Eona’s Legacy
The next tower is found south of the Meadow of Beginnings, on a cliff in the Echo Canyon section of the Field of Plenty.
This activation involves the first major sigil puzzle.
How the Sigil Puzzle Works
Four rotating stone stands surround the tower. Each stand displays a symbol that changes when struck. A reference diagram on a wall north of the structure shows the correct arrangement.
One of the stands is partly concealed behind collapsed masonry on the eastern side, so inspect the full perimeter before starting.
Set the stands as follows:
- North: Theta-like symbol resembling a zero.
- West: Reversed B-shaped symbol.
- East: Ribbon-shaped symbol.
- South: Symbol resembling the number eight.
Strike each stand until its displayed mark matches the required symbol. When all four are correct, Alvwyn’s dialogue confirms that the mechanism is ready.
Return to him to complete the activation.
Shadowed Woods Eona’s Legacy
The Shadowed Woods tower lies east of the Meadow of Beginnings. When you arrive, the structure is completely wrapped in thick spider webs.
Despite the appearance of the area, you do not need to fight a giant spider or complete a lengthy combat encounter.
How to Burn the Webs
Switch to Aria and use one of her explosive abilities against the web-covered tower. The resulting blast ignites the material and clears the entire obstruction.
After the webs have burned away, speak with Alvwyn to restore the structure.
The launcher attached to this Eona’s Legacy is especially useful because it can send you toward another tower route, reducing the amount of climbing required.
Steelheart Fortress Eona’s Legacy
Steelheart Fortress is one of the first locations where activating a tower can be dangerous for under-levelled players. Enemies around the fortress are approximately Level 27 and patrol the routes leading toward the cliff summit.
You can avoid most of these encounters by climbing around the outer terrain with your Familiar.
First Sigil Stand
After speaking with Alvwyn, travel south of the tower. The first rotating stand is near a wall displaying its matching symbol.
Strike the stand until both sigils match.
Second Sigil Stand
Return toward the tower and follow the northern edge of the cliff. A descending route leads to a damaged wall and another stone stand.
The clue is positioned on the outer face of the nearby wall, so move around it before adjusting the mechanism.
Third Sigil Stand
Continue downhill toward the large tree. The third stand appears before you reach it.
Look upward at the pillar on the cliff above. The correct mark is the reversed B-shaped sigil.
Fourth Sigil Stand
Move past the large tree and continue along the path. The final stand is positioned near the cliff wall, with its solution displayed close by.
After setting all four symbols correctly, return to Alvwyn and activate the tower.
Avoid fighting the fortress enemies unless they prevent you from operating a stand. Their patrol routes often leave enough space to complete the puzzle without a full battle.
Silver Ford Lake Eona’s Legacy
Silver Ford Lake introduces an environmental destruction puzzle rather than another sigil sequence. The tower is southeast of Steelheart Fortress and is blocked by differently coloured mineral formations.
A note left by Alvwyn explains the basic objective.
How to Destroy Each Rock Colour
The rocks must be broken with the correct damage source:
- Silver rocks: Use standard attacks from any character.
- Yellow rocks: Use Luto’s Ability Attack.
- Red rocks: Use an explosive ability from Aria.
Trying the wrong attack type will not remove the obstruction.
Reaching the Upper Rocks
Several formations are positioned above ground level. Summon your Familiar and climb the tower’s outer pillars. From there, jump toward the suspended central section and climb onto its upper surface.
Circle the structure carefully and destroy every remaining formation. The tower activates once all required rocks have been cleared.
This puzzle is easier when Aria and Luto are already included in your active party, as switching characters repeatedly from a distance can slow the process.
Moss Forest Logging Site Eona’s Legacy
The Moss Forest Logging Site tower is found south of Silver Ford Lake. Instead of repairing it directly, you must complete a separate trial.
Read Alvwyn’s note beside the tower. A marker then appears at a portal below the structure, near the edge of a cliff.
Completing the Trial
Enter the portal to begin a platforming route. The challenge includes several stone stands that must be adjusted while you progress.
Each stand has a matching sigil displayed beneath or near its platform. Check the surface below the mechanism before striking it, then rotate the stand to the indicated symbol.
Continue through the platforming sections until you reach the end of the trial. After completion, leave the trial area and return to Eona’s Legacy.
The tower can then be activated normally.
Starshade Forest Eona’s Legacy
Starshade Forest contains one of the more easily missed activation puzzles because the required mechanism is not located beside the tower.
The structure sits above a waterfall. After reading Alvwyn’s note, jump down toward the water and enter the cave hidden behind the waterfall.
Using the rising blue current with your Familiar makes it easier to gain enough height to enter the opening.
How to Solve the Timed Sigil Puzzle
Inside the cave is a central terminal surrounded by rotating stone stands. The correct symbol for each stand is marked on the floor in front of it.
The difficulty comes from the timer. As soon as the first stand reaches its correct symbol, a countdown begins. Failing to set the remaining stands before time expires resets the puzzle.
The most reliable method is:
- Inspect the target symbol for every stand.
- Rotate each stand until it is one strike away from the correct position.
- Do not fully complete any stand yet.
- Move to the first prepared stand.
- Strike every stand once while circling the room.
Because every mechanism requires only one final hit, you can complete the entire sequence before the timer expires.
Interact with the central terminal once it becomes active, then return to the tower above the waterfall to restore it.
Dragonrise Basin Eona’s Legacy
The Dragonrise Basin tower is northwest of Starshade Forest. Speak with Alvwyn to reveal the associated trial entrance.
Unlike the Moss Forest challenge, this trial does not contain a sigil puzzle. It focuses entirely on movement and platforming.
Follow the route, use your Familiar where extra height or distance is required, and reach the final platform. Completing the course satisfies the activation condition.
Return to the tower and restore it.
Misty Veil Highlands Eona’s Legacy
The Misty Veil Highlands structure is positioned on elevated terrain near a pond.
After speaking with Alvwyn, follow the marker to another platforming trial. Its mechanics are similar to the Dragonrise Basin challenge.
There are no symbol combinations or elemental obstacles to solve. Concentrate on:
- Timing jumps carefully.
- Using momentum between platforms.
- Summoning the Familiar for difficult gaps.
- Watching for changes in elevation before committing to a leap.
Reach the end of the route, leave the trial, and return to the tower. It rebuilds after the challenge has been completed.
Skyridge Uplands Eona’s Legacy
The northernmost Eona’s Legacy uses a straightforward four-stand sigil puzzle.
Walk behind the tower to find the rotating mechanisms. Unlike several earlier puzzles, the solutions are displayed directly beside them. Each stand has its corresponding symbol marked on a nearby pillar to the right.
Inspect the clue beside each mechanism and strike the stand until the symbols match.
Once all four have been aligned correctly, the tower becomes available for activation. This is one of the quickest Eona’s Legacy puzzles in the game, provided you inspect the pillars before rotating the stands.
Breezewind Hill Eona’s Legacy
Breezewind Hill is one of the most hazardous tower activations because the entire puzzle is located inside an enemy camp. The surrounding enemies are around Level 31 and can overwhelm characters who reach the area early.
You can complete the objective without clearing the camp, but ranged attacks make the process considerably safer. Aria is particularly effective because she can rotate the puzzle stands from a distance.
First Sigil Stand
The first stand is on a low cliff close to the tower.
Its target symbol is displayed nearby. Adjust the stand while remaining at range if enemies are patrolling below.
Second Sigil Stand
Move to the opposite side of the tower and look behind the campfire.
The solution is marked on a nearby stone that is partially covered by vegetation. The correct setting is the reversed B-shaped symbol.
Third Sigil Stand
The last mechanism is near the watchtower, north of the second stand.
Its clue is hidden beneath a group of boxes behind the mechanism. Break the boxes to reveal the symbol, or rotate the stand until the completion dialogue appears.
The correct setting resembles the number eight.
After all three stands are aligned, return to Alvwyn and activate the final tower.
When completing this puzzle below the recommended level, keep moving between interactions. Enemies are more dangerous when allowed to surround you than when pursuing you in a straight line.
Recommended Eona’s Legacy Activation Order
The towers can be completed according to regional access, but the following order generally matches natural progression:
- Meadow of Beginnings
- Field of Plenty
- Shadowed Woods
- Steelheart Fortress
- Silver Ford Lake
- Moss Forest Logging Site
- Starshade Forest
- Dragonrise Basin
- Misty Veil Highlands
- Skyridge Uplands
- Breezewind Hill
Following this route gradually expands the visible map and reduces repeated travel between distant regions.
Some players may reach a later tower before completing an earlier one. This does not usually create a problem, provided the required characters, abilities, and regional access have already been unlocked.
Most Difficult Eona’s Legacy Puzzles
Although every player may struggle with different mechanics, three towers are generally more demanding than the others.
Starshade Forest
The timed sigil sequence can be frustrating until you realise that the stands can be prepared one hit away from completion. Setting them up before triggering the timer turns the puzzle into a short circuit around the room.
Steelheart Fortress
The symbols themselves are not especially difficult, but the stands are spread across different elevations in a hostile region. Careful use of the Familiar prevents unnecessary battles.
Breezewind Hill
The enemy camp creates constant pressure while you search for partially hidden clues. Using Aria to strike mechanisms from range is safer than standing beside each one.
Frequently Asked Questions
What is Eona’s Legacy in Dragonsword Awakening?
Eona’s Legacy refers to ancient towers that unlock fast-travel points, reveal sections of the world map, and provide launch mechanisms for quicker regional movement.
Do I need to activate every Eona’s Legacy?
Activating all towers is not always required to continue the main story, but doing so makes exploration, collecting, questing, and regional travel considerably easier.
Why will an Eona’s Legacy tower not activate?
A tower may remain inactive because a nearby puzzle is incomplete, a trial has not been finished, an obstacle remains on the structure, or a required interaction with Alvwyn or his note has been missed.
Which characters are required for Eona’s Legacy puzzles?
Aria is needed to burn webs and destroy red rocks, while Luto is required for yellow mineral formations. Standard attacks can break silver rocks.
How do sigil stands work?
Hitting a stand rotates its displayed symbol. Continue striking it until the symbol matches the clue shown on a nearby wall, pillar, floor, or stone surface.
Can high-level enemies be avoided?
Yes. Many tower objectives can be completed without defeating every enemy in the surrounding area. Climbing around camps, using ranged attacks, and moving quickly between puzzle components are often safer options.
How do I complete the Starshade Forest timer?
Prepare every rotating stand so that it is one strike away from its required symbol. Then complete each stand with a single hit after the timer begins.
Are the Eona’s Legacy trials combat challenges?
Most are traversal-focused platforming courses. Some include sigil puzzles, but they generally emphasise movement rather than extended combat.
Does activating a tower reveal the entire map?
Each tower removes fog from its associated region rather than revealing every area in the game. You must activate towers across multiple zones to uncover the complete world map.
Final Thoughts
Activating every Eona’s Legacy in Dragonsword Awakening is one of the most important steps toward efficient open-world exploration. The towers provide permanent fast-travel destinations, uncover hidden map details, and create convenient launch routes across difficult terrain.
Most activation challenges are built around a small set of recurring mechanics: matching sigils, using character-specific abilities, climbing with your Familiar, completing traversal trials, and finding environmental clues. Once you understand those systems, even the more complicated towers become manageable.
Prioritise early regional towers, prepare Aria and Luto before visiting Silver Ford Lake, and use ranged attacks when solving the Breezewind Hill puzzle inside the enemy camp. With every Eona’s Legacy restored, travelling between quests, collectibles, bosses, and unexplored locations becomes significantly faster.
Related Guides
Every Playable Character in Dragonsword Awakening and How to Unlock Them
All Eona’s Legacy Locations in Dragonsword Awakening: Activation Guide
Every Statue of Organa Location in DragonSword: Awakening (Complete Restoration Guide)

How to Get Juggernaut in COD Warzone (And the Best Ways to Defeat One)