


Welcome to the ultimate FFXIV The Abyssal Fracture Extreme Trial guide. This comprehensive guide will help you understand the ins and outs of this complex trial and assist you in defeating the formidable foe, Zeromus. So, buckle up and let’s embark on this thrilling journey!
Table of Contents
Introduction
In the realm of Final Fantasy XIV, the Abyssal Fracture Extreme Trial sets a challenging task for players as they face the daunting entity Zeromus. This guide aims to help players navigate this intricate trial effectively and emerge victorious.
Unlocking The Abyssal Fracture Extreme
To unlock this trial, players need to reach level 90 and complete the main scenario quest “Dawn in the Dark”. Once done, engage in conversation with the Wandering Minstrel in Old Sharlayan (x12.7, y14.2). To enter the queue, a minimum item level of 640 is required. However, this prerequisite can be bypassed if you enter with a full party.
Battle Guide
Before we dive into the details of the battle, let’s go over some preparatory steps that can help you gain an advantage.
Preparation
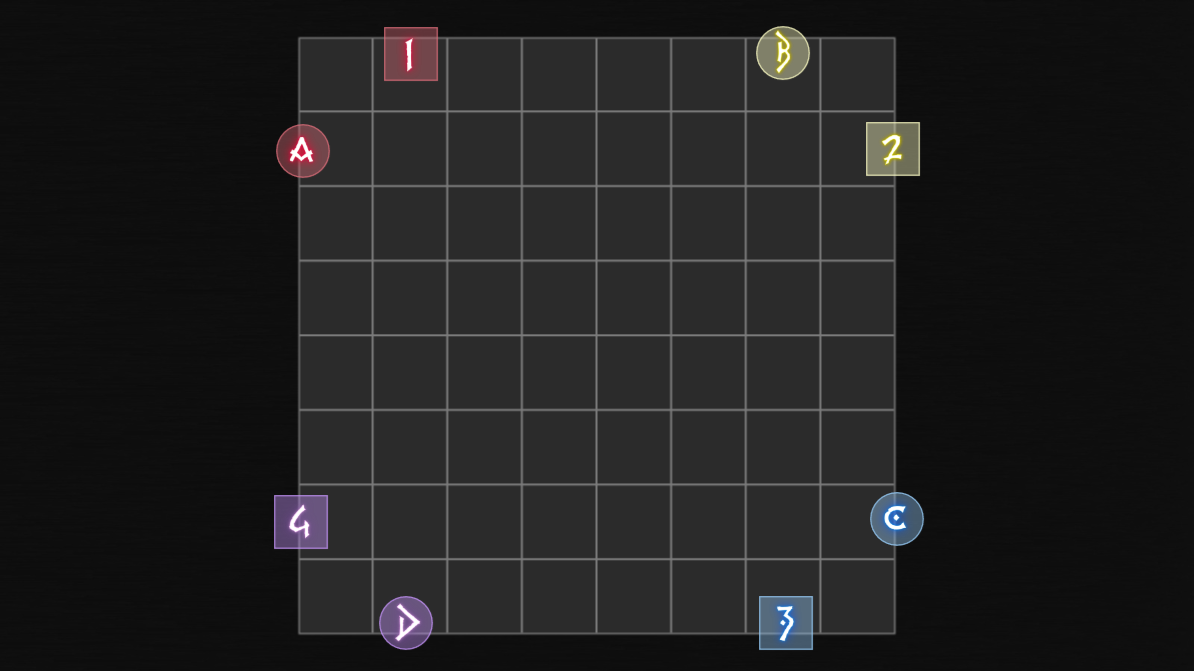
Setting up waymarks is crucial for effective coordination. Divide the DPS and support into pairs, assign them to a corner of the arena, and number each pair from 1 to 4. Ideally, the tank and melee pairs should occupy the 1 and 2 positions, while healer and ranged pairs should be in the 3 and 4 positions.
Phase One: Confronting Zeromus
The battle with Zeromus takes place in a square arena. Players need to be cautious as they can fall off or be knocked off. The fight has a strict enrage timer of 11:05, demanding a DPS check of approximately 56,400 raid DPS.
Zeromus’s Abilities
Zeromus wields a variety of abilities, each designed to challenge the players in a unique way. Here are some key abilities to watch out for:
- Abyssal Nox: A threatening orb that explodes and reduces all player’s HP to 1, inflicting a Doom debuff that can be removed by restoring player HP to full. Following the explosion, several beacons on the arena light up, triggering a circular AoE on each.
- Dark Matter: A tank buster that targets both tanks and deals three hits of heavy magic damage.
- Visceral Whirl: Zeromus’s claws slash across the arena, creating two safe spots in the front and back of the arena. After this, three claw marks in an X-shape appear on the arena, emitting a large diagonal line AoE from its corners.
Strategy for Phase One
The fight commences with Abyssal Nox. Use self-healing and healing buffs to restore all players to full health. Dodge the large orb explosions on the ground by shifting between the top-left and top-middle positions, as there are two waves of explosions.
The tanks should separate from the party and each other and mitigate Dark Matter. Following this, identify the safe spots from the claw marks on the ground and move there for Visceral Whirl. There are two safe spots on the arena. One will be in the front and the other is in the back.
Phase Two: Escalating Battle
In the second phase, Zeromus ups the ante by introducing new abilities.
New Abilities
In this phase, Zeromus gains the following abilities:
- Big Bang: Zeromus unleashes a series of small ground AoEs. All players receive a marked AoE that deals light damage and inflicts a magic vulnerability debuff.
- Void Meteor: Zeromus summons meteors on the arena that deal proximity damage.
- Meteor Impact: Zeromus summons two meteors at the back of the arena and tethers four players of one role to each. These meteors shoot at their location, and players must stretch out the tether while avoiding each other.
- Black Hole: Marks a random player from the boss with a divebomb marker. This summons a black hole which expands and instantly kills players if they are standing inside.
Strategy for Phase Two
Spread out for Big Bang and dodge the AoEs. The spread can be fairly loose as there are plenty of safe spots around the arena. Return to the middle afterwards to heal up.
Phase Three: The Final Showdown
In the final phase, Zeromus intensifies the battle with new abilities.
New Abilities
Zeromus gains the following new abilities during this phase:
- Rend the Rift: Deals heavy raid-wide magic damage. Afterwards, Zeromus will summon many ground line AoEs and circle AoEs.
- Flow of the Abyss: Creates a crack on the side of the arena which does a line AoE across. All players will receive one set of mechanics.
Strategy for Phase Three
Stack up to mitigate and heal through Rend the Rift and Nostalgia. Dodge the AoEs, then head towards your quadrant for Flow of the Abyss. Either stack with your partner, or drop the marker on one spot and move out of it.
Zeromus repeats Nostalgia, Flow of the Abyss, and Chasmic Nails, before finally enraging at 11:05 with Big Bang. Spread out and kill the boss before it kills you!
Strategies for Parties
All strategies here are used for Party Finder. Certain parties have different orderings for meteors such as RMMR instead of MMRR.
Rewards
Upon defeating Zeromus, it will drop a random item level 655 Voidvessel Weapon and a Voidvessel Weapon Coffer (IL 655). Rarely, it will drop a Lynx of Abyssal Grief Flute, Faded Copy of FINAL FANTASY IV: The Final Battle (Endwalker), Zeromus Triple Triad Card, and/or an Abyssal Diamond.
In addition, all party members will receive two Voidvessel Totem, ten of which can be exchanged for any Item Level 655 Voidvessel weapon from Nesvaaz in Radz-at-Han (x10.6, y10.0).
This FFXIV The Abyssal Fracture Extreme Trial guide is the result of a deep-dive analysis of the trial mechanics and our collective expertise in gaming. If the in depth tactics prove difficult, consider The Abyssal Fracture Extreme Trial Boost services to speed up your progression. We hope this guide aids you in your journey through the Abyssal Fracture. Good luck, Warriors of Light!
Related Guides
Every Playable Character in Dragonsword Awakening and How to Unlock Them
All Eona’s Legacy Locations in Dragonsword Awakening: Activation Guide
Every Statue of Organa Location in DragonSword: Awakening (Complete Restoration Guide)
How to Get Juggernaut in COD Warzone (And the Best Ways to Defeat One)